.png)
介绍
Proxmox Virtual Environment 是基于 QEMU/KVM 和 LXC 的开源服务器虚拟化管理解决方案。您可以使用集成的、易于使用的 Web 界面或通过 CLI 管理虚拟机、容器、高可用性集群、存储和网络。
默认访问地址:https://<ip>:8006
PVE U盘启动
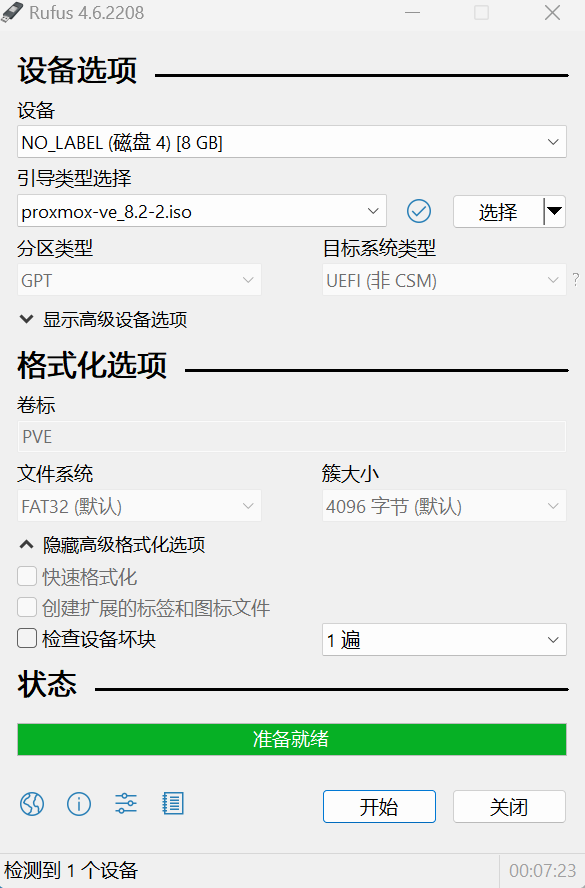
使用Rufus制作U盘启动
PVE优化工具
目前我知道有两个工具pvetools和pve_source,目前只用过pvetools,pve_source 有机会再体验下
2024.11.9 updated
pve_source感觉更好用些
pvetools
#先删除企业源
rm /etc/apt/sources.list.d/pve-enterprise.list

#安装
export LC_ALL=en_US.UTF-8
apt update && apt -y install git && git clone https://github.com/ivanhao/pvetools.git

# 启动工具(cd到目录,启动工具)
cd ~/pvetools &&  ./pvetools.sh


#如何卸载?
删除下载的pvetools目录即可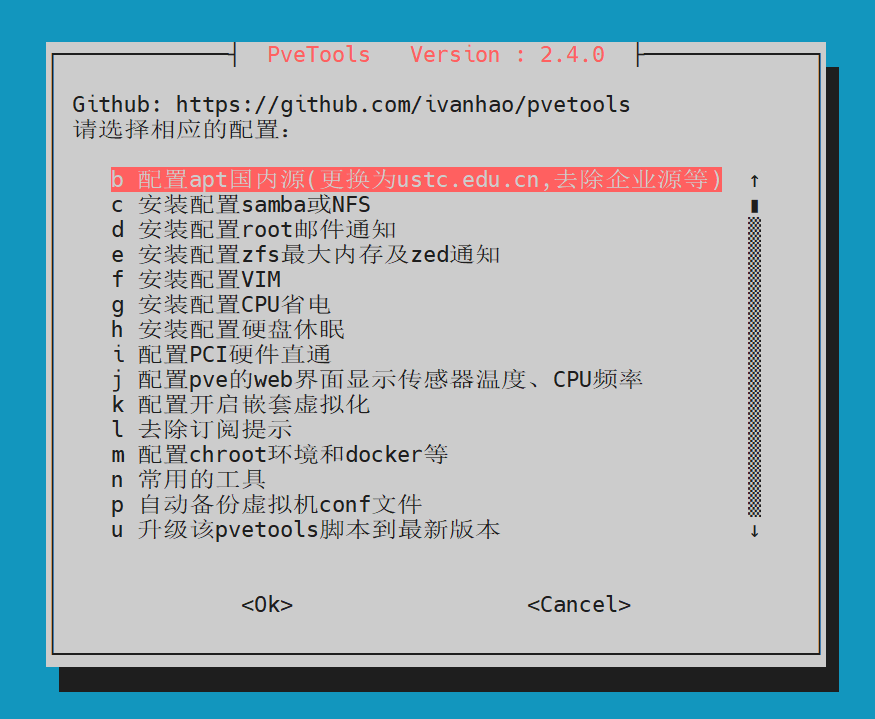
pve_source
pve_source 下载地址及使用方法
使用方法:
①下载后改名为 pve_source.tar.gz
②上传到 /root
③解压压缩包 tar zxvf pve_source.tar.gz
④执行程序./pve_source
或者使用命令
wget -q -O /root/pve_source.tar.gz 'https://bbs.x86pi.cn/file/topic/2023-11-28/file/01ac88d7d2b840cb88c15cb5e19d4305b2.gz' && tar zxvf /root/pve_source.tar.gz && /root/./pve_source

虚拟机无法关机或者重启
进入pve shell命令行中, 如果需要杀的vmid是100, 那就先删除,100的lock文件,之后unlock 100
ls -l /run/lock/qemu-server

# 关闭虚拟机100
rm -f /run/lock/qemu-server/lock-100.conf && qm unlock 100 && qm stop 100

# 查看虚拟机100状态
qm status 100
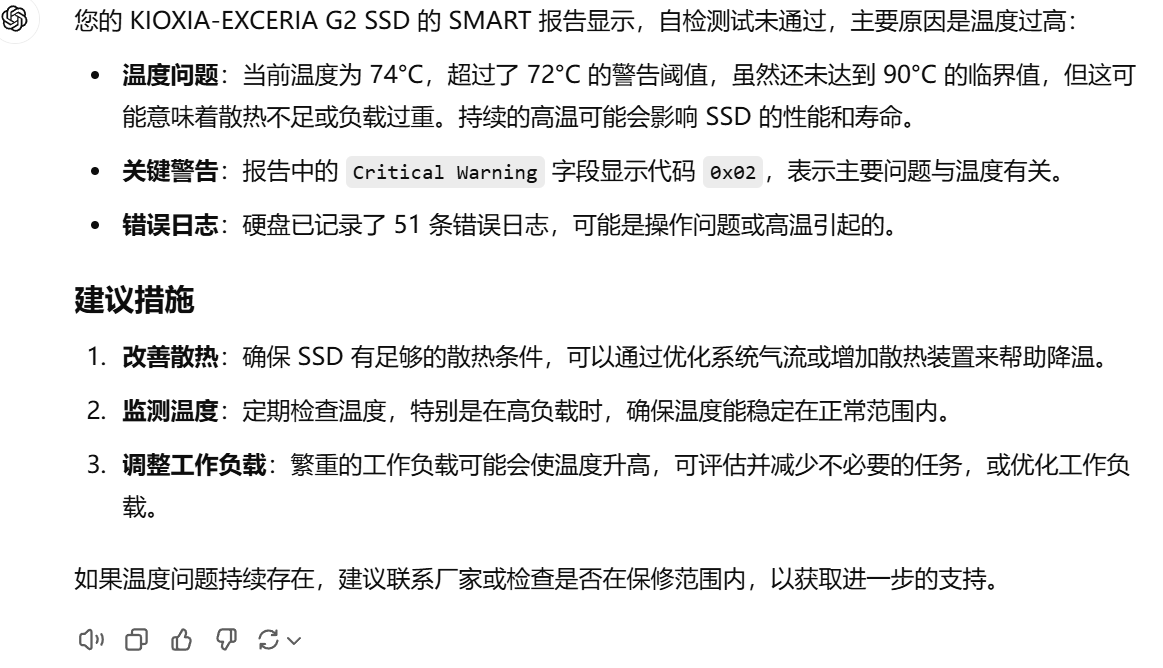
检查硬盘S.M.A.R.T
smartctl --all /dev/nvme0n1
/dev/nvme0n1 是硬盘名称,可以在pve web页面磁盘菜单中看到硬盘设备
root@pve:~# smartctl --all /dev/nvme0n1
smartctl 7.3 2022-02-28 r5338 [x86_64-linux-6.8.4-2-pve] (local build)
Copyright (C) 2002-22, Bruce Allen, Christian Franke, www.smartmontools.org

=== START OF INFORMATION SECTION ===
Model Number:                       KIOXIA-EXCERIA G2 SSD
Serial Number:                      54NA427IK70S
Firmware Version:                   ECFA17.1
PCI Vendor/Subsystem ID:            0x1e0f
IEEE OUI Identifier:                0x8ce38e
Total NVM Capacity:                 500,107,862,016 [500 GB]
Unallocated NVM Capacity:           0
Controller ID:                      1
NVMe Version:                       1.3
Number of Namespaces:               1
Namespace 1 Size/Capacity:          500,107,862,016 [500 GB]
Namespace 1 Formatted LBA Size:     512
Namespace 1 IEEE EUI-64:            8ce38e 03009a763f
Local Time is:                      Sat Nov  9 02:00:29 2024 CST
Firmware Updates (0x12):            1 Slot, no Reset required
Optional Admin Commands (0x0017):   Security Format Frmw_DL Self_Test
Optional NVM Commands (0x005f):     Comp Wr_Unc DS_Mngmt Wr_Zero Sav/Sel_Feat Timestmp
Log Page Attributes (0x0a):         Cmd_Eff_Lg Telmtry_Lg
Maximum Data Transfer Size:         512 Pages
Warning  Comp. Temp. Threshold:     72 Celsius
Critical Comp. Temp. Threshold:     90 Celsius

Supported Power States
St Op     Max   Active     Idle   RL RT WL WT  Ent_Lat  Ex_Lat
 0 +     7.69W       -        -    0  0  0  0        1       1
 1 +     6.18W       -        -    1  1  1  1        1       1
 2 +     5.42W       -        -    2  2  2  2        1       1
 3 -   0.0500W       -        -    3  3  3  3     7000    5000
 4 -   0.0050W       -        -    4  4  4  4    13000   36000

Supported LBA Sizes (NSID 0x1)
Id Fmt  Data  Metadt  Rel_Perf
 0 +     512       0         2
 1 -    4096       0         1

=== START OF SMART DATA SECTION ===
SMART overall-health self-assessment test result: FAILED!
- temperature is above or below threshold

SMART/Health Information (NVMe Log 0x02)
Critical Warning:                   0x02
Temperature:                        74 Celsius
Available Spare:                    100%
Available Spare Threshold:          5%
Percentage Used:                    0%
Data Units Read:                    222,178 [113 GB]
Data Units Written:                 544,032 [278 GB]
Host Read Commands:                 2,666,990
Host Write Commands:                6,028,249
Controller Busy Time:               21
Power Cycles:                       13
Power On Hours:                     102
Unsafe Shutdowns:                   3
Media and Data Integrity Errors:    0
Error Information Log Entries:      51
Warning  Comp. Temperature Time:    12
Critical Comp. Temperature Time:    0
Thermal Temp. 1 Transition Count:   23
Thermal Temp. 2 Transition Count:   3
Thermal Temp. 1 Total Time:         9565
Thermal Temp. 2 Total Time:         6874

Error Information (NVMe Log 0x01, 16 of 63 entries)
Num   ErrCount  SQId   CmdId  Status  PELoc          LBA  NSID    VS
  0         51     0  0x001c  0x4004  0x028            0     0     -
我这块硬盘 显示 FAILED ,有点摸不着头脑,我这块固态刚买的,然后我把信息发给GPT说是温度过高,看了下机子,发现风扇线被我拔了,金属外壳烫死了,终于知道安装个Deepin,装了好几次老是卡主的原因了
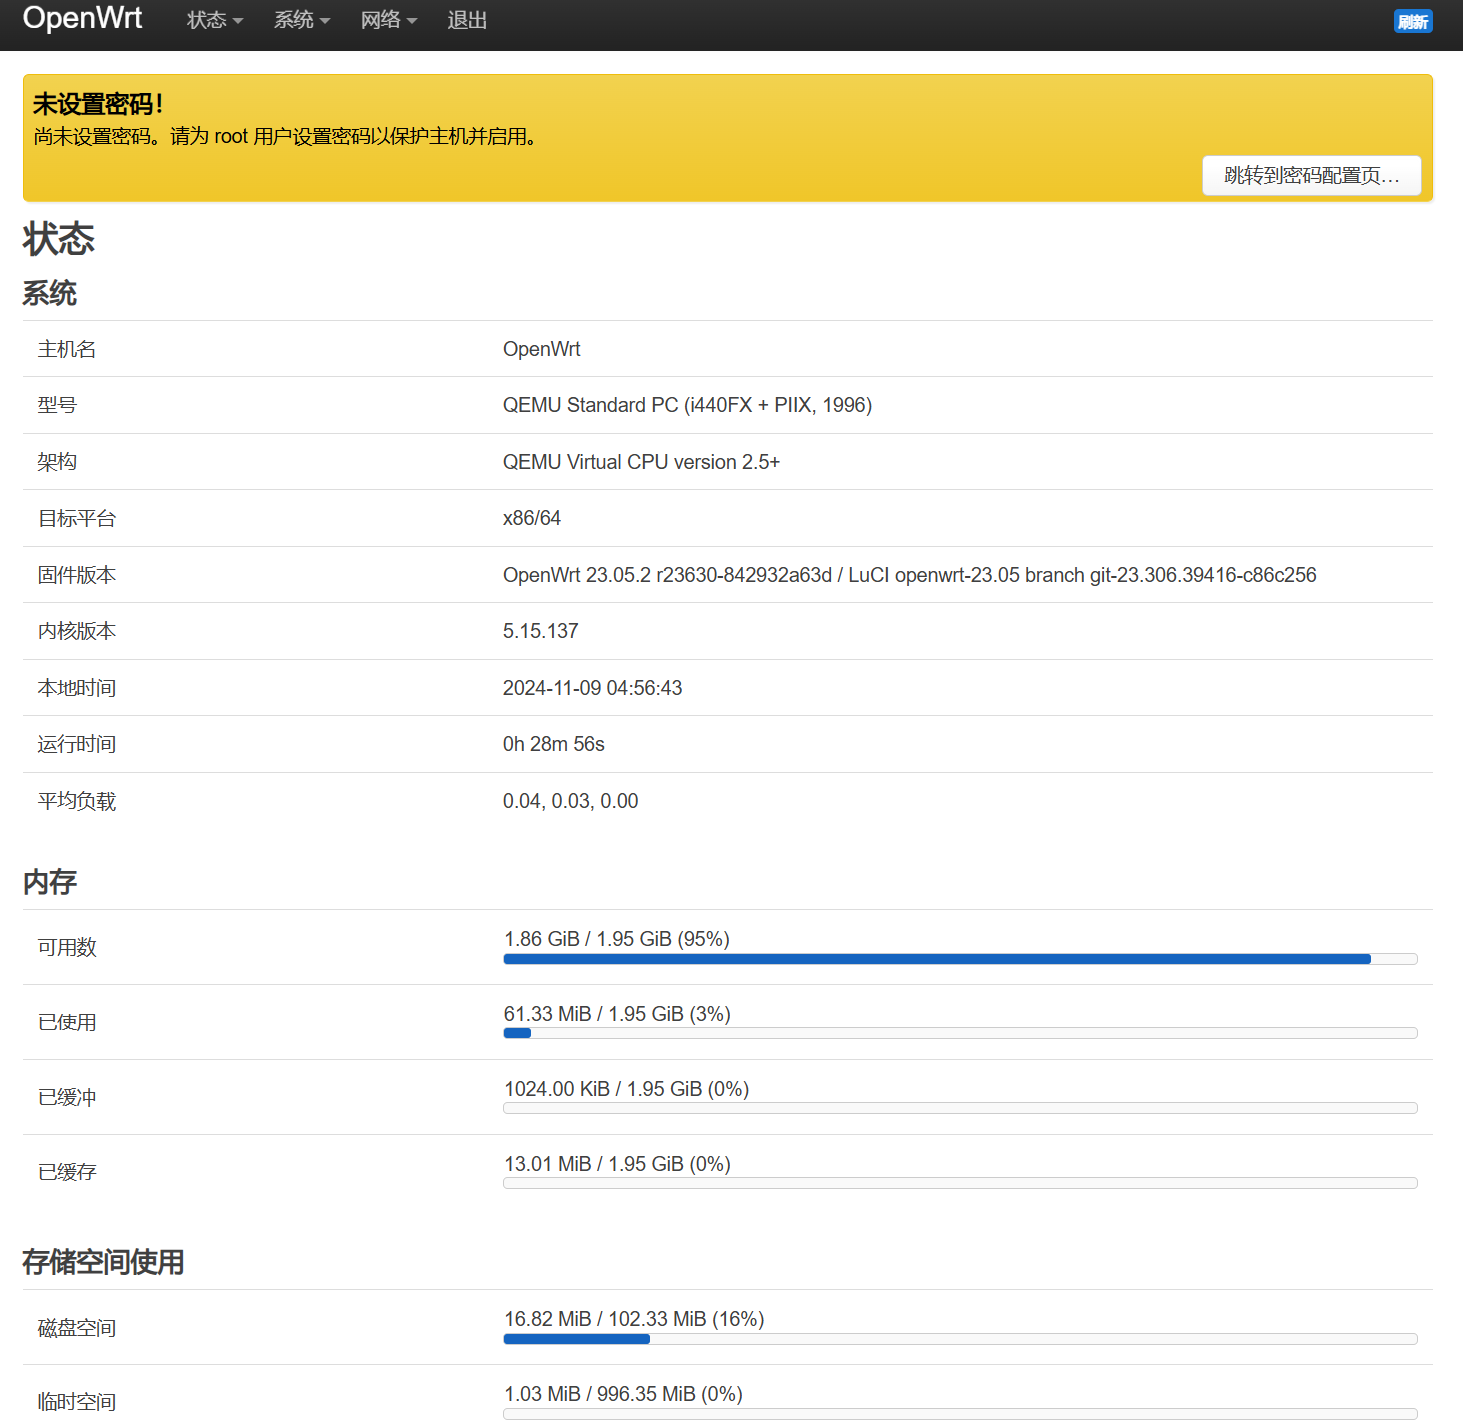
OpenWrt
下载安装
op镜像
官方镜像
Github:https://github.com/openwrt/openwrt
镜像下载站:https://mirrors.sustech.edu.cn/openwrt/
2024.11.9 截止目前最新版本是 OpenWrt 23.05.5
sirpdboy
Github:https://github.com/sirpdboy/openwrt
恩山论坛发布地址:https://www.right.com.cn/forum/thread-4053752-1-1.html
Kwrt
下载地址:https://openwrt.ai/
eSir PlayGround
eSir GDQ 高大全:https://drive.google.com/drive/folders/1PsS3c0P7a4A4KY8plQg4Fla8ZI-PGBb1
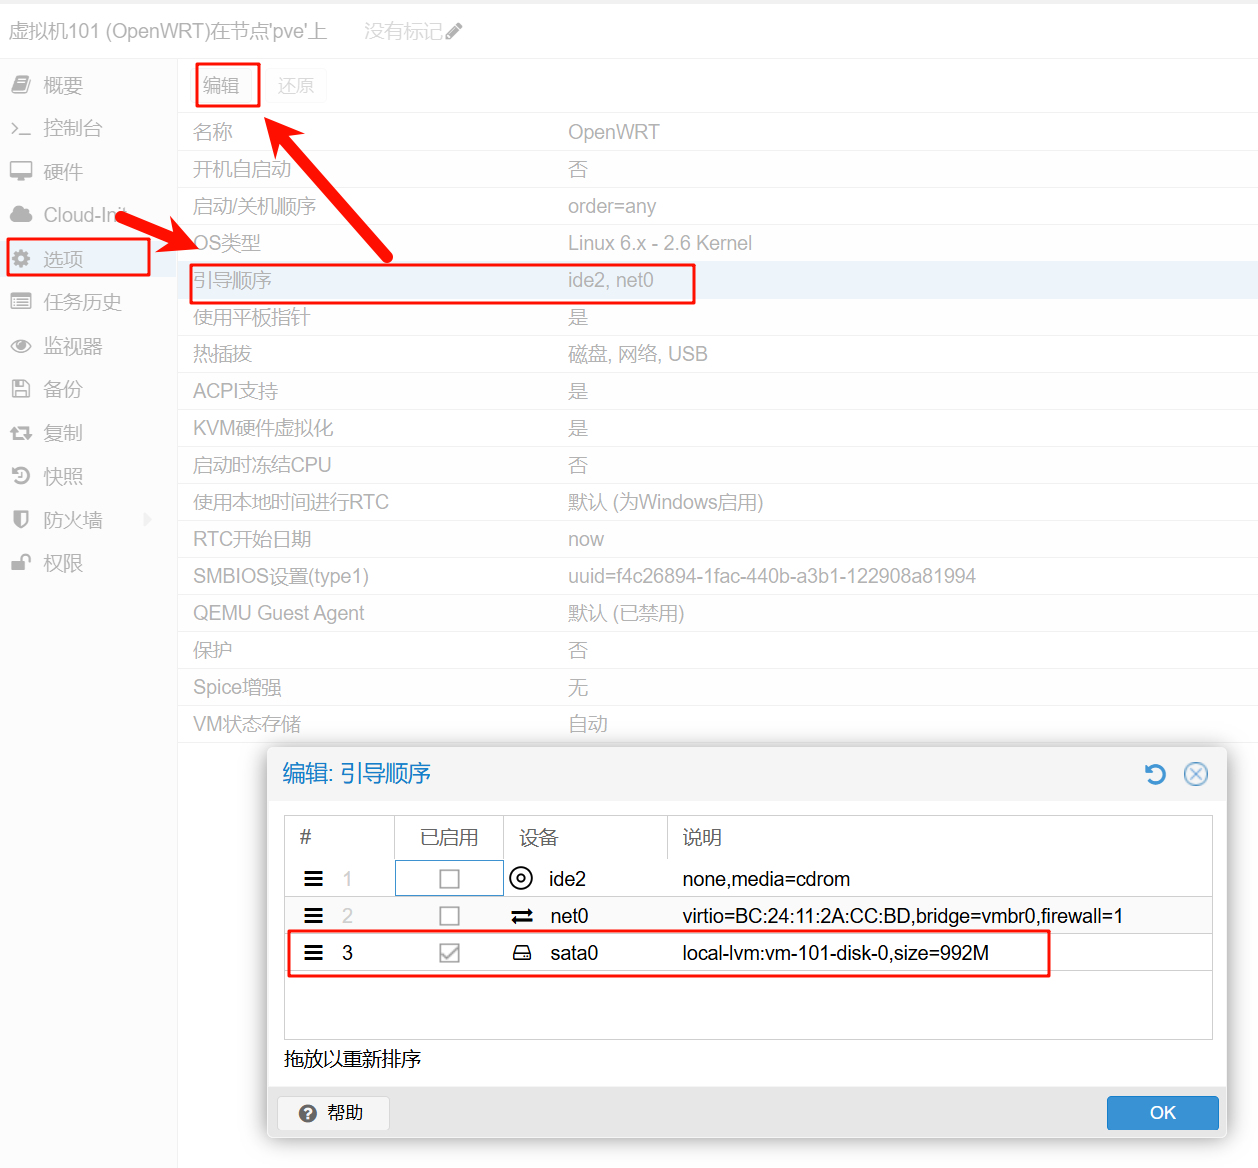
新建虚拟机
操作系统 >> 不使用任何介质
磁盘删除,后面要用命令将镜像转换成磁盘
CPU核心数给2,内存2048M,自己看着给
导入磁盘镜像
我这里用的官方镜像 ,下载解压出img结尾的镜像,上传到默认的 local >> IOS镜像 中去,磁盘路径是 /var/lib/vz/template/iso/,shell登录执行以下命令
qm importdisk 101 /var/lib/vz/template/iso/openwrt-23.05.2-x86-64-generic-ext4-combined-efi.img local-lvm
101 是新建虚拟机的编号
local-lvm 是安装磁盘位置
会出现一个 未使用的磁盘0 ,然后编辑,选择 SATA

选项 >> 引导顺序,只勾选sata
修改OP配置
修改访问ip vi /etc/config/network
修改网关和DNS
network --> interfaces ,点击第一个网卡的“edit”按钮,
默认进来的是General Settings,将 IPv4 网关 设置为主路由器的地址
点击 Advanced Settings 修改Use custom DNS servers,可以设置多个,设置一个为主路由器地址,加一两个公共DNS,223.5.5.5(阿里),8.8.8.8(谷歌)
点击Save按钮,在 interfaces 页面 点击Save & Apply按钮生效。
修改OP镜像源
vi /etc/opkg/distfeeds.conf
src/gz openwrt_core https://mirrors.tuna.tsinghua.edu.cn/openwrt/releases/23.05.2/targets/x86/64/packages
src/gz openwrt_base https://mirrors.tuna.tsinghua.edu.cn/openwrt/releases/23.05.2/packages/x86_64/base
src/gz openwrt_luci https://mirrors.tuna.tsinghua.edu.cn/openwrt/releases/23.05.2/packages/x86_64/luci
src/gz openwrt_packages https://mirrors.tuna.tsinghua.edu.cn/openwrt/releases/23.05.2/packages/x86_64/packages
src/gz openwrt_routing https://mirrors.tuna.tsinghua.edu.cn/openwrt/releases/23.05.2/packages/x86_64/routing
src/gz openwrt_telephony https://mirrors.tuna.tsinghua.edu.cn/openwrt/releases/23.05.2/packages/x86_64/telephony
将其他内容注释,添加以上内容保存,执行 opkg update 更新
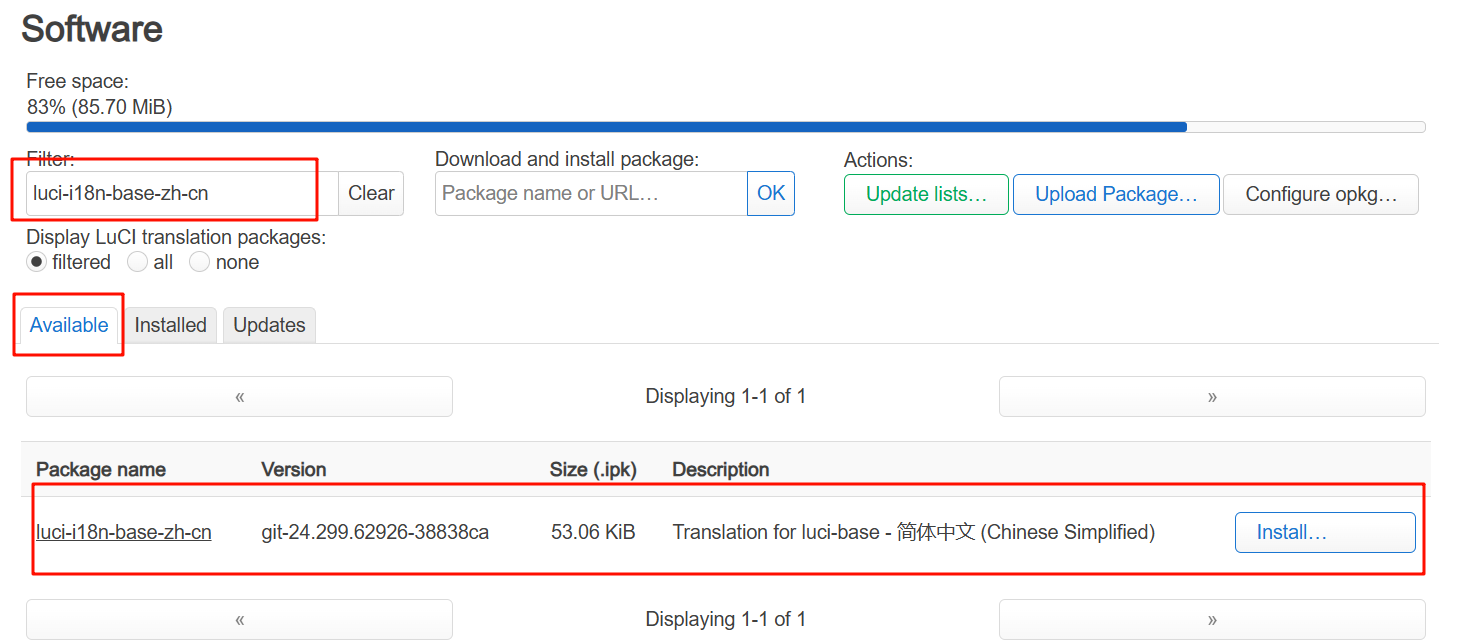
设置中文
这里是安装的官方OpenWRT,页面才长这样,安装的其他版本op就不用管了
luci-i18n-base-zh-cn
设置主题
这里是安装的官方OpenWRT,页面才长这样,安装的其他版本op就不用管了
安装
luci-compat和luci-lib-ipkg包下载主题包,下载地址:https://github.com/jerrykuku/luci-theme-argon/releases/download/v2.3.1/luci-theme-argon_2.3.1_all.ipk
v2.x.x Support the latest version of LuCI
在软件包菜单中上传主题包进行安装
Debian/Deepin
安装输入法
安装输入法
apt install fcitx
apt install fcitx-googlepinyin
安装图形桌面
KDE
#安装KDE
sudo apt install kde-plasma-desktop——最小安装:仅安装桌面环境以及基础软件
sudo apt install kde-standard   ——标准安装:桌面环境以及常用软件

#期间会出现一个让你选择的窗口,直接回车就是选择目前的桌面环境

#切换桌面环境指令
switchdesk kde
switchdesk gnome
评论区